The Sweetest Cherry Pie Bombs Recipe for Fruity Bliss
Sweet memories burst through every delectable cherry pie bomb that captures childhood nostalgia.
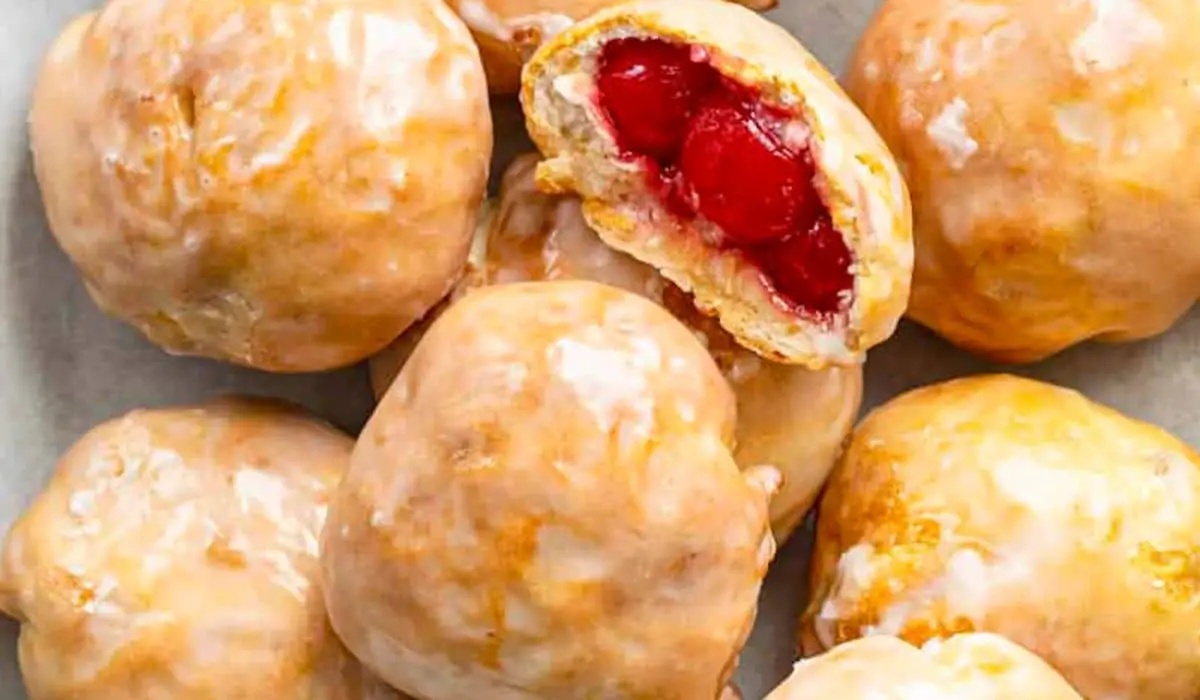
Crisp pastry shells cradle luscious fruit centers waiting to surprise you.
Unexpected flavor combinations make these tiny treats irresistible for casual gatherings.
Perfectly balanced between tart cherries and buttery dough, these miniature delights promise pure excitement.
Compact yet powerful, each bite delivers concentrated fruity goodness that dances across your palate.
Minimal ingredients and straightforward techniques mean anyone can create these stunning little desserts.
No complicated skills needed – just enthusiasm and a love for playful sweets.
Watch how simple ingredients become magical morsels that will delight everyone at the table.
Cherry Pie Bombs That’ll Steal the Dessert Show

Cherry Pie Bomb Essentials to Have Ready
Dough Ingredients:Filling Ingredients:Coating and Frying Ingredients:Bake Cherry Pie Bombs Like a Pro

Step 1: Craft the Pastry Dough
Mix flour, sugar, and salt in a large mixing bowl until evenly combined. Cut cold butter into tiny cubes and work into the flour mixture using a pastry cutter until it looks like rough, crumbly texture. Whisk eggs and vanilla extract together, then softly fold into the flour blend to create a tender dough. Gently knead the dough on a lightly floured surface until smooth, then refrigerate for half an hour to set.
Step 2: Prepare Coating Mixture
Combine in a shallow dish:Mix these ingredients thoroughly to create a delightful coating for the bombs.
Step 3: Create Cherry Filling
Blend together:Stir until you have a chunky, rich fruit mixture bursting with cherry goodness.
Step 4: Shape the Bombs
Roll out the chilled dough to 1/4-inch thickness and cut into circular portions. Place a small spoonful of cherry mixture in the center of each dough circle. Carefully fold and seal the edges, forming compact, round bombs that look like little culinary treasures.
Step 5: Deep Fry to Golden Perfection
Heat vegetable oil in a deep skillet to 350°F, maintaining a consistent temperature. Gently lower the cherry bombs into the hot oil, frying 2-3 minutes until they turn a gorgeous golden brown and develop a crispy exterior.
Step 6: Final Touch and Serve
Remove bombs with a slotted spoon, letting excess oil drip away. Immediately roll the warm bombs in the prepared cinnamon-breadcrumb-sugar coating. Transfer to a wire rack and let cool for 5 minutes before serving these delectable treats.
Tricks to Make Cherry Pie Bombs Irresistible
Cherry Pie Bomb Remix Ideas to Explore
Top Picks to Pair with Cherry Pie Bombs
Storing Cherry Pie Bombs Without Losing That Flaky Magic
Cherry Pie Bombs: Everything You’re Wondering
Yes, thawed frozen cherries work perfectly. Just ensure they’re well-drained to prevent excess moisture in the filling.
Seal the edges tightly by pinching and crimping the dough carefully. Use a fork to create a secure seal and prevent filling from escaping.
Vegetable or canola oil are ideal due to their high smoke point and neutral flavor. Ensure the oil is consistently heated at 350°F for perfect crispiness.
After frying, place the bombs on a wire rack with paper towels underneath to drain excess oil. Avoid stacking them, which can trap moisture and increase greasiness.
Print
Cherry Pie Bombs Recipe
- Total Time: 38-40 minutes
- Yield: 8 1x
Description
Sweet cherry pie bombs blend buttery pastry with luscious cherry filling, creating a delightful handheld dessert. Crisp golden crusts and juicy cherries make these treats irresistible for you to savor and share.
Ingredients
Main Filling:
- 1 can cherry pie filling
- 2 cups fresh cherries, pitted
Dough Base:
- 2 cups all-purpose flour
- 1/2 cup granulated sugar
- 1/2 cup unsalted butter, cold
- 2 large eggs
- 1 tsp vanilla extract
Coating and Topping:
- 1/2 cup powdered sugar
- 1/4 cup breadcrumbs
- 2 tbsp cinnamon
- 1/4 cup vegetable oil (for frying)
- 1 pinch salt
Instructions
- Combine flour, sugar, and salt in a large mixing bowl, creating a uniform dry mixture.
- Cut cold butter into small cubes and incorporate into the flour mixture using a pastry cutter until it resembles coarse crumbs.
- Whisk eggs and vanilla extract together, then gently fold into the flour mixture to form a soft dough.
- Knead the dough briefly on a lightly floured surface until smooth, then refrigerate for 30 minutes to firm up.
- Mix breadcrumbs, cinnamon, and powdered sugar in a separate shallow dish for coating.
- Roll out the chilled dough to 1/4-inch thickness and cut into circular portions.
- Blend fresh pitted cherries with canned cherry pie filling to create a rich, chunky fruit mixture.
- Place a small spoonful of cherry mixture in the center of each dough circle.
- Carefully fold and seal the edges of each dough portion, creating compact, round bombs.
- Heat vegetable oil in a deep skillet to 350°F, ensuring consistent temperature.
- Gently lower the cherry bombs into hot oil, frying 2-3 minutes until golden brown and crispy.
- Remove bombs with a slotted spoon, allowing excess oil to drain.
- Immediately roll warm bombs in the prepared cinnamon-breadcrumb-sugar coating.
- Transfer to a wire rack and let cool for 5 minutes before serving.
Notes
- Chill the dough thoroughly to prevent sticking and ensure easier handling during shaping.
- Use fresh, ripe cherries for maximum flavor intensity and natural sweetness in the filling.
- Monitor oil temperature carefully to achieve perfect golden-brown exterior without burning the delicate pastry.
- Experiment with alternative fillings like mixed berries or peach compote for exciting flavor variations.
- Prep Time: 30 minutes
- Cook Time: 6-8 minutes
- Category: Desserts, Snacks
- Method: Frying
- Cuisine: American
Nutrition
- Serving Size: 8
- Calories: 300
- Sugar: 15 g
- Sodium: 150 mg
- Fat: 15 g
- Saturated Fat: 6 g
- Unsaturated Fat: 9 g
- Trans Fat: 0 g
- Carbohydrates: 40 g
- Fiber: 2 g
- Protein: 4 g
- Cholesterol: 50 mg
Truc Tran (Kris)
Senior Food Editor
Expertise
Home Cooking, Meal Planning, Recipe Development, Baking and Pastry, Food Editor, Cooking-video Maker, Vietnamese Food Evaluation Expert
Education
Truc Tran (Kris), an experienced food writer and editor, is great at exploring and describing global cuisines, from simple street food to fancy dining. In her writing, she skillfully mixes different flavors, cooking methods, and culinary traditions, showing the unique character of various cultures through their food and drinks. On azcuisines.com, Kris highlights her knowledge, especially in Asian cuisine and worldwide traditional dishes.