Heavenly Layered Chocolate Dream Cake Recipe for Sweet Bliss
My culinary adventures recently discovered this layered chocolate dream cake that promises pure indulgence.
Sweet memories of childhood desserts inspired its creation.
Chocolate lovers will find themselves transported to a realm of decadent pleasure.
Rich cocoa layers meld together with silky frosting, creating a sensational experience.
Every slice promises a delightful journey through intense chocolate landscapes.
Chocolate enthusiasts can anticipate a dessert that redefines classic cake expectations.
We invite you to uncover the magic hidden within these delectable chocolate layers.
Why You’ll Adore Layered Chocolate Dream Cake
What You’ll Need For Layered Chocolate Dream Cake
Cake Base Ingredients:Cream Filling Ingredients:Finishing Ingredients:Steps To Make Layered Chocolate Dream Cake
Step 1: Prepare Biscuit Base
Preheat the oven to 350°F. In a large mixing bowl, whip eggs and sugar until they become light and airy.
Add water and blend thoroughly. Carefully sift flour, baking powder, and cocoa powder into the mixture.
Gently fold the ingredients until they are perfectly combined. Transfer the batter into a greased cake pan that has been lightly dusted with flour.
Bake for 25-30 minutes until a toothpick comes out clean. Allow the cake base to cool completely at room temperature.
Step 2: Create Creamy Filling
In a saucepan, whisk together:Slowly pour in milk while continuously stirring. Cook the mixture over medium heat until it thickens and becomes smooth.
Let the mixture cool down. In a separate bowl, beat butter until it becomes creamy and soft.
Gradually incorporate the cooled milk mixture and vanilla extract, beating until the filling is silky and uniform.
Step 3: Build Cake Layers
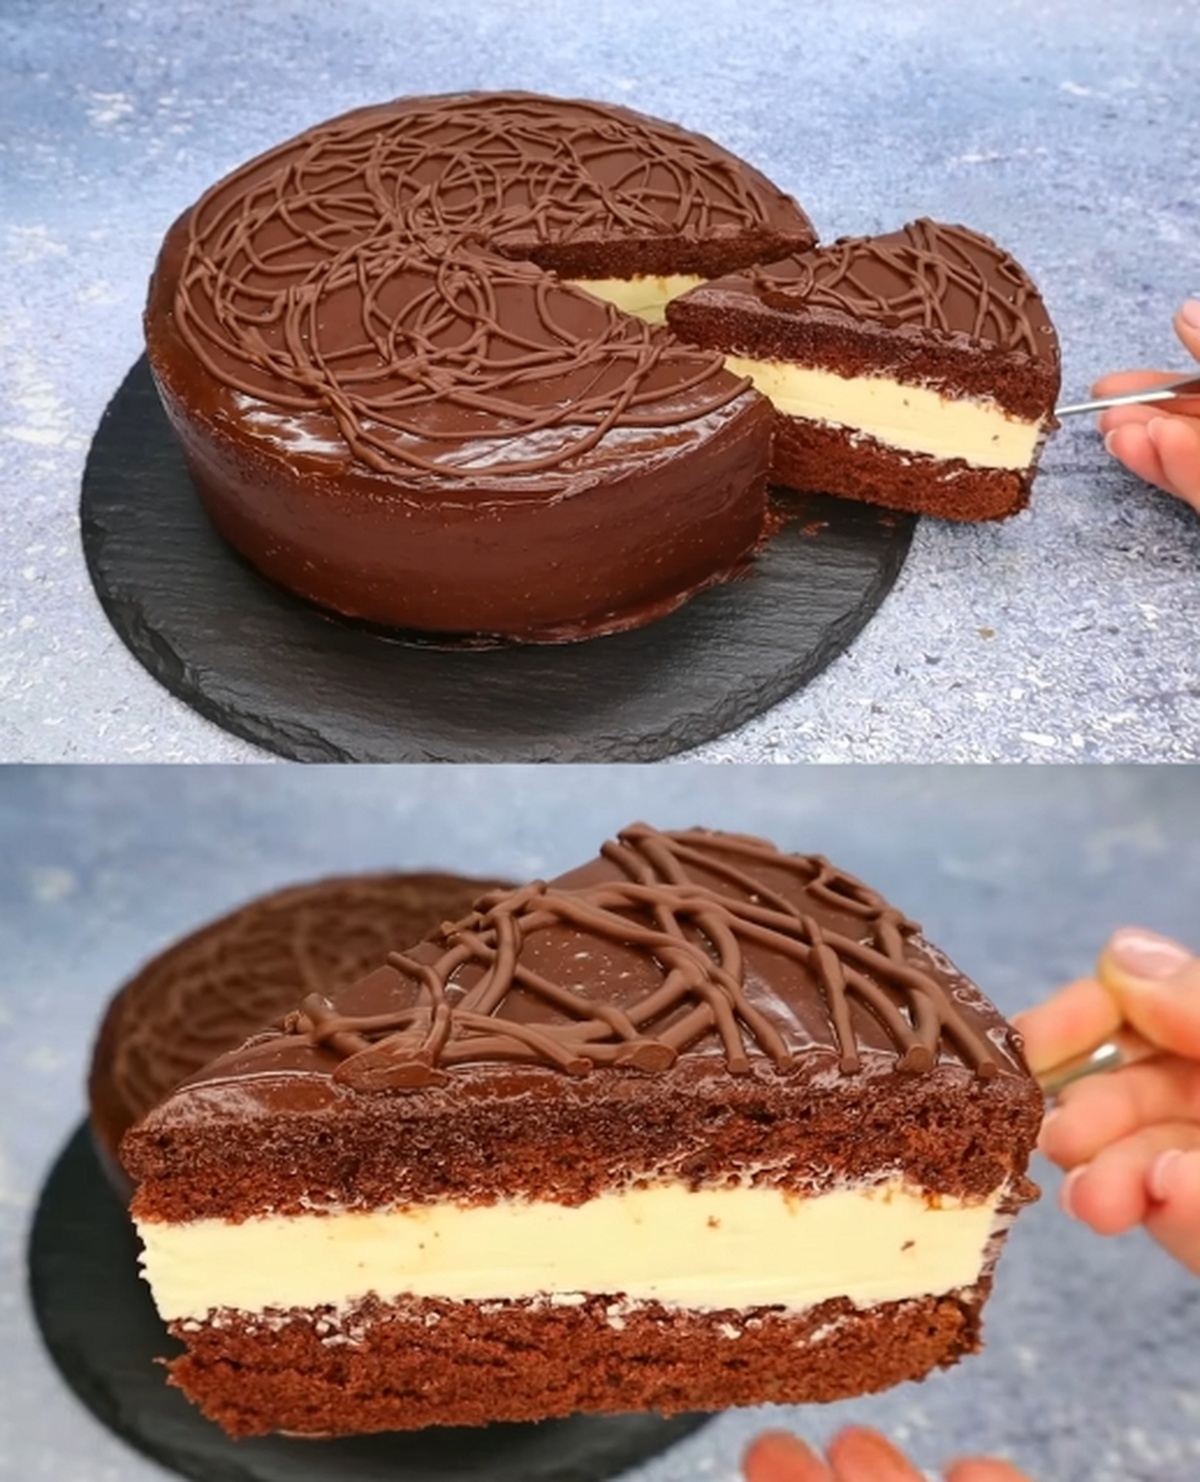
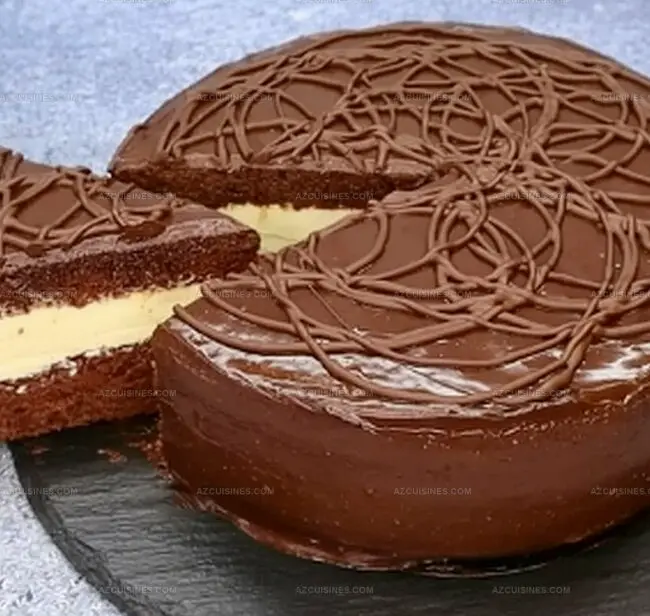
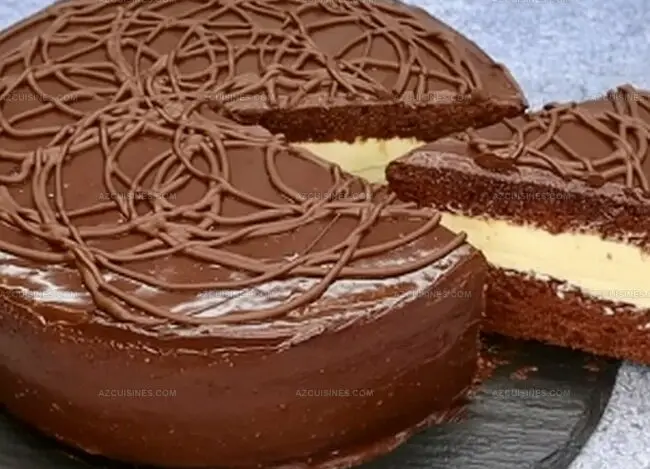
Carefully slice the biscuit base horizontally into even layers.
Mix water and condensed milk to create a moistening liquid. Gently brush each cake layer with the liquid to enhance moisture and flavor.
Spread the creamy filling generously between each layer and on top of the cake.
Step 4: Craft Chocolate Glaze
In a saucepan, combine:Heat the ingredients over low heat, stirring constantly until the mixture becomes smooth and glossy.
Once the glaze reaches a perfect consistency, pour it evenly over the assembled cake.
Step 5: Chill and Enjoy
Refrigerate the cake for several hours or overnight to allow the flavors to meld and the glaze to set.
When ready to serve, slice into beautiful portions and enjoy the rich, decadent chocolate layers.
Helpful Tips For Layered Chocolate Dream Cake
Tasty Twists On Layered Chocolate Dream Cake
Perfect Pairings For Layered Chocolate Dream Cake
How To Store Layered Chocolate Dream Cake Right
Layered Chocolate Dream Cake Questions Answered
Properly beat eggs and sugar until they become pale and increase in volume. Sift dry ingredients to prevent lumps and fold gently to maintain air bubbles, which keeps the base soft and tender.
Yes, replace regular flour with gluten-free flour blend. Use a 1:1 ratio and add a pinch of xanthan gum to help bind the ingredients and maintain the cake’s structure.
Cook the mixture on low heat while constantly stirring to prevent burning. Use a whisk to beat butter and gradually incorporate the milk mixture, ensuring no lumps form for a silky-smooth texture.
Use low heat and stir continuously.
Print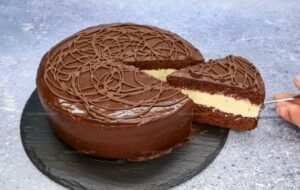
Layered Chocolate Dream Cake Recipe
- Total Time: 70 minutes
- Yield: 8 1x
Description
Chocolate lovers rejoice with this mesmerizing Layered Chocolate Dream Cake that promises pure indulgence. Rich chocolate sponge, silky ganache, and luxurious buttercream create a dessert that will transport you to a world of sweet perfection.
Ingredients
Cake Layers:
- 4 eggs
- 180 grams (6.35 ounces) sugar
- 100 milliliters (3.4 fluid ounces) water
- 130 grams (4.6 ounces) flour
- 1 teaspoon baking powder
- 2–3 tablespoons cocoa powder
Cream and Filling Ingredients:
- 2 eggs
- 50 grams (1.76 ounces) sugar
- 150 milliliters (5.07 fluid ounces) condensed milk
- Vanilla extract
- 3 tablespoons starch
- 250 milliliters (8.45 fluid ounces) milk
- 250 grams (8.82 ounces) butter, softened
Liquid and Glaze Components:
- 150 milliliters (5.07 fluid ounces) water
- 2 tablespoons condensed milk
- 3 tablespoons cocoa powder
- 3 tablespoons sugar
- 4 tablespoons sour cream
- 50 grams (1.76 ounces) butter
Instructions
- Prepare the sponge foundation at 180°C by whisking eggs and sugar until voluminous and pale. Gently incorporate water, then delicately fold in sifted flour, cocoa, and baking powder until harmoniously blended.
- Transfer the batter into a prepared cake pan, ensuring even distribution. Bake for 25-30 minutes until a skewer emerges clean. Allow the sponge to cool completely at room temperature.
- Create the luxurious cream filling by combining eggs, sugar, condensed milk, and starch in a saucepan. Gradually introduce milk while continuously stirring to prevent lumps.
- Cook the cream mixture over medium heat, stirring constantly until it thickens to a custard-like consistency. Remove from heat and let it cool completely.
- Whip butter until creamy and smooth. Gradually incorporate the cooled milk mixture and vanilla, beating until the filling reaches a silky, spreadable texture.
- Slice the cooled sponge horizontally into layers. Prepare an impregnation liquid by mixing water and condensed milk.
- Delicately brush each cake layer with the impregnation mixture to enhance moisture and flavor. Spread the cream filling generously between layers and across the top.
- For the chocolate glaze, combine cocoa powder, sugar, sour cream, and butter in a saucepan. Heat gently, stirring until the mixture becomes glossy and smooth.
- Pour the warm chocolate glaze evenly over the assembled cake, allowing it to cascade down the sides.
- Refrigerate the cake for 4-6 hours or overnight to set and develop deeper flavors. Slice and serve chilled for optimal taste and texture.
Notes
- Ensure eggs are at room temperature for better incorporation and fluffier texture when beating the biscuit base.
- Use a light hand when folding flour to prevent deflating the batter, maintaining a delicate, airy cake structure.
- Sift cocoa powder and flour together to eliminate lumps and create a more uniform, smooth cake texture.
- When cooking cream filling, stir continuously to prevent scorching and achieve a silky, lump-free consistency.
- Brush cake layers with milk mixture generously but not excessively to keep the cake moist without becoming soggy.
- For a gluten-free version, substitute wheat flour with almond or coconut flour and use gluten-free baking powder.
- Enhance flavor by adding a splash of coffee or rum to the impregnation mixture for deeper chocolate notes.
- Prep Time: 40 minutes
- Cook Time: 30 minutes
- Category: Desserts
- Method: Baking
- Cuisine: American
Nutrition
- Serving Size: 8
- Calories: 455
- Sugar: 36g
- Sodium: 150mg
- Fat: 31g
- Saturated Fat: 18g
- Unsaturated Fat: 13g
- Trans Fat: 0g
- Carbohydrates: 40g
- Fiber: 1g
- Protein: 5g
- Cholesterol: 130mg
Truc Tran (Kris)
Senior Food Editor
Expertise
Home Cooking, Meal Planning, Recipe Development, Baking and Pastry, Food Editor, Cooking-video Maker, Vietnamese Food Evaluation Expert
Education
Truc Tran (Kris), an experienced food writer and editor, is great at exploring and describing global cuisines, from simple street food to fancy dining. In her writing, she skillfully mixes different flavors, cooking methods, and culinary traditions, showing the unique character of various cultures through their food and drinks. On azcuisines.com, Kris highlights her knowledge, especially in Asian cuisine and worldwide traditional dishes.