
Quick & Joyful Mini Cherry Pies Recipe for Sweet Moments
Crafting delightful mini cherry pies brings pure joy to your kitchen adventure.
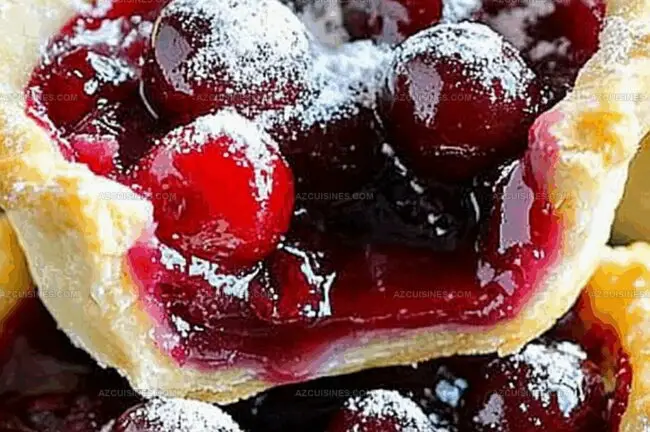
Sweet cherries nestled in buttery pastry create an irresistible dessert.
Compact and charming, these tiny treats promise to impress even the most discerning palate.
Homemade goodness shines through each carefully assembled miniature pie.
Little hands and big appetites will eagerly reach for these delectable morsels.
Small yet spectacular, these cherry pies deliver maximum flavor in bite-sized perfection.
You can’t resist the temptation of these adorable, ruby-red delights waiting to be savored.
What Makes Mini Cherry Pies a Sweet Classic

What You’ll Need for Mini Cherry Pie Filling
Pie Dough Base:Fruit Filling:Finishing Touches:Bake These Mini Cherry Pies in No Time
Step 1: Whip Up the Dough Base
Mix flour and salt in a mixing bowl. Slice cold butter into tiny cubes and work it into the flour using your fingertips until the mixture looks like chunky sand. The goal is creating a crumbly texture that will make your pie crust flaky and delicious.
Step 2: Knead and Chill the Dough
Pour cold water gradually into the flour mixture. Gently knead until the dough forms a smooth ball. Wrap the dough in plastic wrap and park it in the refrigerator for half an hour. This resting time helps the gluten relax and prevents a tough crust.
Step 3: Prepare Luscious Cherry Filling
Pit and chop fresh cherries into small pieces. In a separate bowl, combine the cherries with:Stir until cherries are completely coated with the sweet mixture.
Step 4: Preheat and Prep Baking Surface
Warm the oven to 375°F. Lightly grease a muffin tin to ensure easy pie removal later.
Step 5: Roll and Shape Pie Crusts
Sprinkle flour on your work surface. Roll the chilled dough to about 1/8-inch thickness. Use a round cookie cutter to create circles that will line the muffin cups with a slight overhang.
Step 6: Craft Pie Shells
Press dough circles into muffin tin cups. Trim excess edges to create perfect little pie shells.
Step 7: Fill with Cherry Goodness
Spoon cherry filling into each pie shell. Distribute evenly and avoid overfilling to prevent messy spills.
Step 8: Create Delightful Pie Tops
Cut additional dough strips or shapes for pie tops. Design a beautiful lattice or traditional cover.
Step 9: Add Golden Finishing Touch
Whisk egg with water to make an egg wash. Brush over pie tops. Sprinkle turbinado sugar for a sparkling, crisp finish.
Step 10: Bake to Perfection
Slide the muffin tin into the oven. Bake for 25-30 minutes until the crust turns a gorgeous golden brown and the filling bubbles slightly. Let pies cool in the tin for 10 minutes, then transfer to a wire rack for complete cooling.
Tips for Perfectly Juicy Cherry Pie Bites
Sweet Mini Cherry Pie Variations You’ll Love
Pairings That Bring Out Cherry Pie’s Best
Storing Mini Cherry Pies Without Losing Flavor
Mini Cherry Pie FAQs You Should Know
Use a light dusting of flour or cornstarch on the bottom crust before adding the cherry filling. This helps absorb excess moisture and creates a barrier between the wet filling and the dough.
Yes, absolutely! Thaw and drain frozen cherries completely before using. Pat them dry with paper towels to remove excess liquid, which could make the filling too runny.
Refrigerate the dough for 10-15 minutes if it starts to feel soft or sticky. Cold dough is easier to handle and creates flakier pie crusts. Keep your butter and water very cold during preparation.
Print
Mini Cherry Pies Recipe
- Total Time: 55-60 minutes
- Yield: 8 1x
Description
Delightful mini cherry pies bring sweet nostalgia to dessert tables with perfect handheld charm. Buttery pastry and rich cherry filling create irresistible miniature treats that spark joy for anyone craving classic homemade comfort.
Ingredients
Main Ingredients:
- 2 cups all-purpose flour
- 1/2 cup unsalted butter
- 1 1/2 cups fresh cherries
- 1/4 cup sugar
Filling Ingredients:
- 2 tablespoons cornstarch
- 1 tablespoon lemon juice
- 1/4 teaspoon vanilla extract
Topping/Finishing Ingredients:
- 1 large egg
- 1 tablespoon water
- 2 tablespoons turbinado sugar
- 1/4 teaspoon salt
Instructions
- Prepare the pie dough by mixing flour and salt in a large mixing bowl, then cut cold butter into small cubes and incorporate into the flour mixture until it resembles coarse crumbs.
- Gradually add cold water to the flour mixture, gently kneading until the dough comes together into a cohesive ball. Wrap in plastic and refrigerate for 30 minutes to allow the gluten to relax.
- While the dough chills, pit and chop fresh cherries into small pieces. Combine cherries with sugar, cornstarch, lemon juice, and vanilla extract in a separate bowl, stirring until the cherries are evenly coated.
- Preheat the oven to 375°F and lightly grease a muffin tin to prevent sticking.
- Roll out the chilled dough on a floured surface to approximately 1/8-inch thickness. Use a round cookie cutter to cut circles large enough to line the muffin tin cups with slight overhang.
- Carefully press the dough circles into the muffin tin, trimming excess edges and creating small pie shells.
- Spoon the cherry filling into each pie shell, distributing evenly and avoiding overfilling.
- Cut additional dough strips or shapes for pie tops, creating a lattice or traditional cover design.
- Whisk the egg with water to create an egg wash, then brush over the pie tops. Sprinkle turbinado sugar over the surface for a crisp, sparkling finish.
- Bake for 25-30 minutes until the crust turns golden brown and the filling bubbles slightly. Allow to cool in the tin for 10 minutes before transferring to a wire rack.
Notes
- Chill the butter and water thoroughly to ensure a flaky, tender pie crust that crumbles perfectly with each bite.
- Use fresh, ripe cherries for the most vibrant flavor, or opt for frozen cherries if fresh are unavailable during off-season months.
- Prevent soggy bottoms by dusting the pie shells lightly with flour before adding the cherry filling, which helps absorb excess moisture.
- Consider dietary alternatives like using gluten-free flour blend for a celiac-friendly version or replacing butter with coconut oil for a dairy-free option.
- Prep Time: 30 minutes
- Cook Time: 25-30 minutes
- Category: Desserts, Snacks
- Method: Baking
- Cuisine: American
Nutrition
- Serving Size: 8
- Calories: 200
- Sugar: 10g
- Sodium: 100mg
- Fat: 9g
- Saturated Fat: 5g
- Unsaturated Fat: 3g
- Trans Fat: 0g
- Carbohydrates: 28g
- Fiber: 2g
- Protein: 3g
- Cholesterol: 30mg
Truc Tran (Kris)
Senior Food Editor
Expertise
Home Cooking, Meal Planning, Recipe Development, Baking and Pastry, Food Editor, Cooking-video Maker, Vietnamese Food Evaluation Expert
Education
Truc Tran (Kris), an experienced food writer and editor, is great at exploring and describing global cuisines, from simple street food to fancy dining. In her writing, she skillfully mixes different flavors, cooking methods, and culinary traditions, showing the unique character of various cultures through their food and drinks. On azcuisines.com, Kris highlights her knowledge, especially in Asian cuisine and worldwide traditional dishes.