
Dainty Mini Pavlova Nests Recipe: Sweet Clouds of Joy
Crafting delightful mini pavlova nests creates a magical dessert experience that surprises and delights.
Sweet meringue clouds promise incredible texture and elegance.
Crisp exterior and soft marshmallow center invite playful indulgence.
Whisked egg whites transform into delicate pillows of sugary perfection.
Elegant yet simple, these miniature treats work beautifully for intimate gatherings or celebration dessert tables.
Each bite delivers a dreamy combination of crunch and softness that melts on your tongue.
Come explore this charming dessert that turns ordinary moments into sweet memories.
Why Mini Pavlova Nests Are So Special
What You Need for Perfect Pavlova Nests
Meringue Base:Cream Topping:Garnish:Bake Mini Pavlova Nests with Ease
Step 1: Prepare Baking Station
Preheat the oven to 300°F. Line a baking sheet with parchment paper and draw 3-inch circle templates for uniform pavlova nests.
Step 2: Separate Egg Whites
Carefully separate egg whites into a spotless, completely dry mixing bowl. Ensure no yolk traces remain to prevent whipping issues.
Step 3: Initial Whipping
Use an electric mixer on medium speed to whip egg whites until soft, foamy peaks emerge.
Step 4: Build Meringue Structure
Gradually add sugar one tablespoon at a time while whisking at high speed. Continue until the mixture becomes glossy, with stiff peaks that stand upright and look thick and lustrous.
Step 5: Enhance Meringue Stability
Sprinkle in dry ingredients:Gently fold with a spatula to maintain the voluminous texture.
Step 6: Create Meringue Nests
Pipe or spoon meringue onto the prepared baking sheet. Use circular motions to shape small nests with slightly raised edges.
Step 7: Form Filling Cavities
Create a gentle indentation in the center of each meringue nest to hold cream and berries later.
Step 8: Slow Bake
Bake for 60-75 minutes until meringues become crisp and pale ivory. Turn off the oven and let nests cool completely inside with the door slightly open.
Step 9: Prepare Whipped Cream
Whip heavy cream with powdered sugar until soft, billowy peaks form.
Step 10: Assemble Pavlova
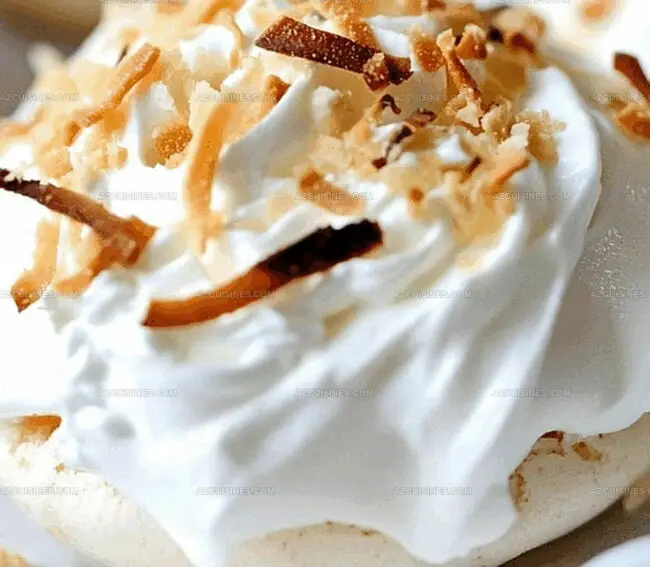
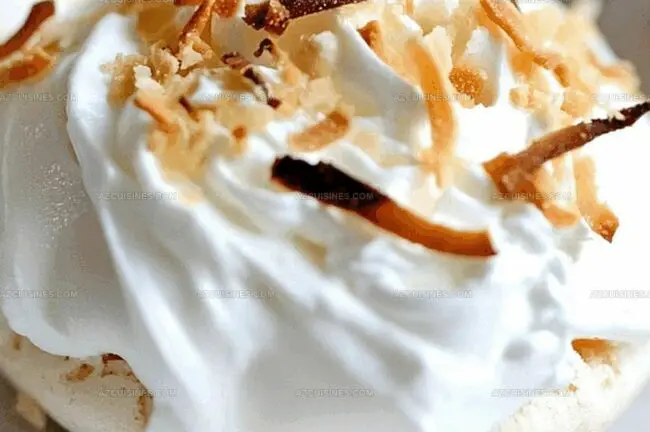
Fill each cooled meringue nest with whipped cream and top with a colorful mix of berries.
Step 11: Add Finishing Touch
Garnish with delicate fresh mint leaves for an extra aromatic element.
Step 12: Serve Immediately
Serve right away to maintain the crisp meringue texture and prevent soggy bottoms.
Secrets for Fluffy Meringue and Crispy Shells
Flavor Styles for Mini Pavlova Nest Fans
What to Serve With Pavlovas That Pop
Store Pavlova Nests Without Losing That Crunch
FAQs for Mini Pavlova Meringue Magic
Cream of tartar and white vinegar help stabilize the egg whites, preventing them from deflating and creating a more stable, glossy meringue with better structure and volume.
Look for stiff, glossy peaks that hold their shape when you lift the whisk. The meringue should be thick, smooth, and form a firm point without drooping when you turn the whisk upside down.
Use a circular template underneath your parchment paper and a large star-tipped piping bag. Pipe in a circular motion, building up the edges to create a nest shape with a slight indentation in the center.
Print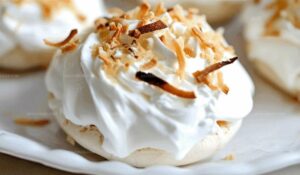
Mini Pavlova Nests Recipe
- Total Time: 80-95 minutes
- Yield: 6 1x
Description
Sweet clouds of meringue topped with fresh berries make these mini pavlova nests a delightful Australian dessert. Crisp exterior and marshmallow-like center create an irresistible treat perfect for summer gatherings you’ll savor with friends.
Ingredients
Main Ingredients:
- 4 egg whites
- 200 g (7 oz) granulated sugar
- 1 tsp white vinegar
Stabilizing Ingredients:
- 1 tsp cornstarch
- 1/4 tsp cream of tartar
Topping Ingredients:
- 240 ml (1 cup) heavy whipping cream
- 30 g (2 tbsp) powdered sugar
- 150 g (5 oz) mixed fresh berries (strawberries, raspberries, blueberries)
- 1 tbsp fresh mint leaves (optional)
Instructions
- Preheat the oven to 300°F (150°C) and line a baking sheet with parchment paper, creating a template of 3-inch circles for uniform pavlova nests.
- Separate egg whites into a spotlessly clean, dry mixing bowl, ensuring no yolk remnants that could prevent proper whipping.
- Whisk egg whites using an electric mixer on medium speed until soft, foamy peaks begin to form.
- Gradually add granulated sugar, one tablespoon at a time, while continuously whisking at high speed until glossy, stiff peaks develop and mixture becomes thick and lustrous.
- Sprinkle cornstarch, cream of tartar, and white vinegar over the meringue, gently folding with a spatula to maintain the voluminous texture.
- Carefully pipe or spoon the meringue onto the prepared baking sheet, creating small nest-like shapes with slightly raised edges using circular motions.
- Create a subtle indentation in the center of each meringue nest to hold the future cream and berries.
- Bake for 60-75 minutes until meringues appear crisp and pale ivory, then turn off the oven and allow nests to cool completely inside with the door slightly ajar.
- Whip heavy cream with powdered sugar until soft, billowy peaks form.
- Once cooled, gently fill each meringue nest with whipped cream and arrange a colorful medley of mixed berries on top.
- Optionally garnish with delicate fresh mint leaves for an aromatic finishing touch.
- Serve immediately to preserve the crisp meringue texture and prevent sogginess.
Notes
- Spotless Equipment Matters: Use a grease-free, completely dry bowl and whisk to ensure egg whites whip perfectly without deflating.
- Sugar Technique: Add sugar incrementally and slowly to create stable, glossy meringue with the right structure and shine.
- Moisture Control: Keep meringues crisp by storing in an airtight container and avoiding humid environments to prevent softening.
- Flexibility for Diets: Swap dairy cream with coconut whipped cream for a vegan version, and use alternative sweeteners for low-sugar options.
- Prep Time: 20 minutes
- Cook Time: 60-75 minutes
- Category: Desserts, Snacks
- Method: Baking
- Cuisine: Australian
Nutrition
- Serving Size: 6
- Calories: 248
- Sugar: 28 g
- Sodium: 14 mg
- Fat: 18 g
- Saturated Fat: 11 g
- Unsaturated Fat: 7 g
- Trans Fat: 0 g
- Carbohydrates: 26 g
- Fiber: 1 g
- Protein: 3 g
- Cholesterol: 63 mg
Truc Tran (Kris)
Senior Food Editor
Expertise
Home Cooking, Meal Planning, Recipe Development, Baking and Pastry, Food Editor, Cooking-video Maker, Vietnamese Food Evaluation Expert
Education
Truc Tran (Kris), an experienced food writer and editor, is great at exploring and describing global cuisines, from simple street food to fancy dining. In her writing, she skillfully mixes different flavors, cooking methods, and culinary traditions, showing the unique character of various cultures through their food and drinks. On azcuisines.com, Kris highlights her knowledge, especially in Asian cuisine and worldwide traditional dishes.