
The Best No-Bake Twinkie Pudding Cake Recipe for Sweet Success
Whipping up a delightful no-bake twinkie pudding cake brings pure dessert magic right to your kitchen counter.
Creamy layers combine with classic snack cake nostalgia for an effortless sweet treat.
Childhood memories dance across your taste buds with each decadent spoonful.
Rich pudding nestles between soft cake pieces, creating a delectable texture that melts smoothly.
Simple ingredients merge into an irresistible dessert that requires zero baking skills.
Cool and refreshing, this dessert comes together faster than you can imagine.
Dig in and savor every heavenly bite of this quick and easy confection.
Why You’ll Love No-Bake Twinkie Pudding Cake
All the Sweet Layers in This Twinkie Treat
Cake Base:Creamy Components:Flavor Enhancers:How to Build a No-Bake Twinkie Pudding Cake

Step 1: Slice Twinkie Magic
Unwrap the Twinkies and slice each one horizontally into delicate, thin layers. This creates a soft, cloud-like base that will make your dessert absolutely irresistible.
Step 2: Melt Buttery Goodness
Gently melt butter in a small saucepan over low heat until it transforms into a golden liquid. Let it cool slightly, allowing its rich flavor to develop.
Step 3: Whip Up Creamy Pudding
In a large mixing bowl, whisk together:Blend until the mixture becomes smooth and thick, creating a luxurious pudding base that will make your taste buds dance.
Step 4: Craft Fluffy Whipped Cream
Beat together:Whip until stiff peaks form, creating a cloud-like topping that will crown your dessert with pure deliciousness.
Step 5: Build the Twinkie Foundation
Arrange the Twinkie slices in a single layer across the bottom of a rectangular dish, creating an even and inviting base.
Step 6: Drizzle Butter Bliss
Pour the slightly cooled melted butter over the Twinkie layer, ensuring every slice gets a touch of golden richness.
Step 7: Pour Pudding Perfection
Carefully spread the prepared vanilla pudding over the Twinkie base, covering it completely with a smooth, creamy layer.
Step 8: Add Crunchy Texture
Sprinkle across the pudding:This adds a delightful crunch and flavor contrast that will elevate your dessert.
Step 9: Crown with Whipped Cream
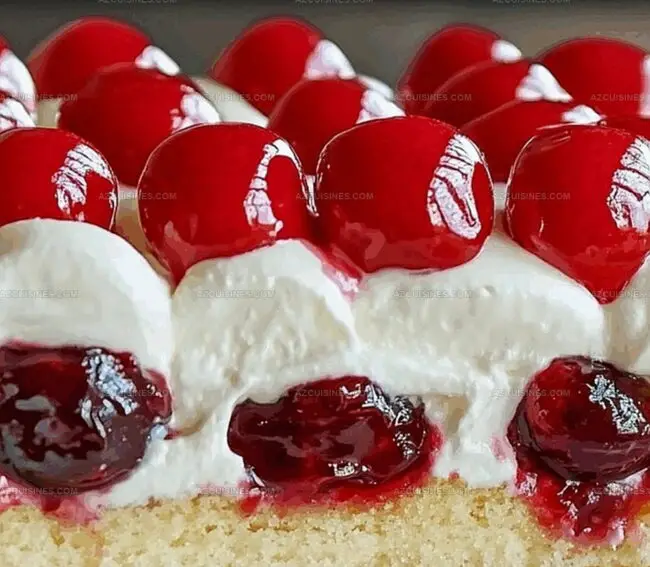
Generously cover the entire surface with the fluffy whipped cream, spreading it evenly to create a beautiful, billowy topping.
Step 10: Chill and Set
Refrigerate the dessert for at least 3 hours or overnight. This allows the flavors to mingle and the pudding to set into a perfect, creamy consistency.
Step 11: Serve and Enjoy
Remove from the refrigerator and let sit at room temperature for 10 minutes before serving. This slight warming will make each bite absolutely heavenly.
Top Tips for Perfect No-Bake Cake Texture
Flavor Combos for Your Twinkie Pudding Spin
What Goes Great With Twinkie Pudding Cake
Store This No-Bake Wonder Like a Pro
Quick Answers for Twinkie Pudding Lovers
Yes, instant pudding mix works perfectly and will help the dessert set quickly and maintain a smooth texture.
You can substitute graham cracker crumbs with gluten-free graham crackers or crushed gluten-free cookies to create a similar base and texture.
Slice Twinkies thinly and ensure they are not overly saturated with butter; a light drizzle is sufficient to maintain their structural integrity.
Whole milk provides the best richness, but you can use 2% milk or non-dairy alternatives like almond or oat milk, though the texture might be slightly less creamy.
Print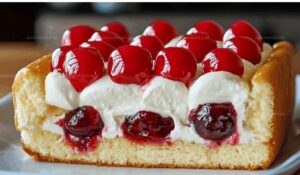
No-Bake Twinkie Pudding Cake Recipe
- Total Time: 3 hours 40 minutes
- Yield: 8 1x
Description
Creamy no-bake twinkie pudding cake delivers nostalgic comfort with layers of sweet memories. Cool vanilla pudding and classic Twinkie flavors meld perfectly for a quick dessert you’ll crave again and again.
Ingredients
Main Cake Ingredients:
- 2 packages Twinkies
- 4 cups whole milk
- 1 package instant vanilla pudding mix
Cream and Topping:
- 2 cups heavy cream
- 1/4 cup powdered sugar
- 1 tsp vanilla extract
Additional Ingredients:
- 1/4 cup unsalted butter
- 2 tbsp graham cracker crumbs
- 1 pinch salt
Instructions
- Unwrap Twinkies and slice each horizontally into thin layers, creating a uniform base for the pudding cake.
- Melt butter in a small saucepan over low heat until completely liquefied and golden, then set aside to cool slightly.
- In a large mixing bowl, whisk vanilla pudding mix with whole milk until smooth and thickened, approximately 2-3 minutes.
- Prepare whipped cream by beating heavy cream with powdered sugar and vanilla extract until stiff peaks form.
- Layer the bottom of a rectangular dish with Twinkie slices, creating an even foundation.
- Drizzle melted butter over the Twinkie layer, ensuring even distribution.
- Carefully pour the prepared vanilla pudding over the Twinkie base, spreading gently to cover completely.
- Sprinkle graham cracker crumbs and a pinch of salt across the pudding surface for added texture and flavor.
- Cover the dessert with whipped cream, spreading it smoothly and evenly to the edges.
- Refrigerate for at least 3 hours or overnight to allow flavors to meld and pudding to set firmly.
- Before serving, let the cake rest at room temperature for 10 minutes to soften slightly.
Notes
- Slice Twinkies with a sharp, clean knife for uniform layers that create a consistent texture and prevent crumbling during assembly.
- Use room temperature milk and butter to ensure smoother mixing and better incorporation of pudding and melted butter.
- Chill mixing bowl and whisk before whipping cream to achieve faster, more stable peaks with maximum volume.
- For gluten-free adaptation, substitute graham cracker crumbs with crushed gluten-free cookies or toasted nuts to maintain crunch and flavor profile.
- Prep Time: 30 minutes
- Cook Time: 0 minutes
- Category: Desserts, Snacks
- Method: No-Bake
- Cuisine: American
Nutrition
- Serving Size: 8
- Calories: 400
- Sugar: 22 g
- Sodium: 150 mg
- Fat: 24 g
- Saturated Fat: 14 g
- Unsaturated Fat: 8 g
- Trans Fat: 0 g
- Carbohydrates: 40 g
- Fiber: 1 g
- Protein: 5 g
- Cholesterol: 70 mg
Truc Tran (Kris)
Senior Food Editor
Expertise
Home Cooking, Meal Planning, Recipe Development, Baking and Pastry, Food Editor, Cooking-video Maker, Vietnamese Food Evaluation Expert
Education
Truc Tran (Kris), an experienced food writer and editor, is great at exploring and describing global cuisines, from simple street food to fancy dining. In her writing, she skillfully mixes different flavors, cooking methods, and culinary traditions, showing the unique character of various cultures through their food and drinks. On azcuisines.com, Kris highlights her knowledge, especially in Asian cuisine and worldwide traditional dishes.