The Gooey Peanut Butter Earthquake Cake Recipe for Sweet Cravings
Whipping up a peanut butter earthquake cake promises pure dessert magic that’ll make taste buds dance with excitement.
Sweet tremors of flavor ripple through each delectable slice, creating culinary excitement.
Layers of creamy goodness collapse and intertwine like delicious geological events on your plate.
Chocolate and peanut butter merge in a decadent symphony that defies ordinary dessert expectations.
Unexpected textures and rich ingredients collaborate to produce something far beyond a typical cake experience.
Kitchen adventures await with this spectacular treat that blends comfort and surprise in every single bite.
You’ll want to savor each incredible forkful and share this sensational creation with everyone around you.
Why You’ll Love Peanut Butter Earthquake Cake From First Bite
What Goes Into Peanut Butter Earthquake Cake
Cake Base Ingredients:Peanut Butter Filling Ingredients:Chocolate Topping and Garnish Ingredients:How To Make Peanut Butter Earthquake Cake Step By Step
Step 1: Prepare Baking Station
Grab a 9×13-inch baking pan and coat it generously with cooking spray or butter to prevent sticking. Set your oven to preheat at 350°F.
Step 2: Create Cake Base
In a large mixing bowl, combine:Whisk everything together until the batter looks smooth and free of lumps. Transfer the mixture to the prepared pan, spreading it evenly across the bottom.
Step 3: Mix Peanut Butter Cream
Using an electric mixer, blend softened cream cheese and peanut butter until creamy. Gradually mix in powdered sugar, alternating with milk to keep the texture silky and consistent.
Step 4: Add Peanut Butter Layer
Drop spoonfuls of the peanut butter cream randomly over the cake batter. Create swirls and pockets across the surface for a marbled effect.
Step 5: Craft Chocolate Sauce
In a saucepan over medium heat, melt butter. Whisk in:Stir until completely blended and smooth.
Step 6: Finish Chocolate Topping
Remove the chocolate mixture from heat. Stir in powdered sugar until the sauce becomes silky and pourable.
Step 7: Drizzle and Decorate
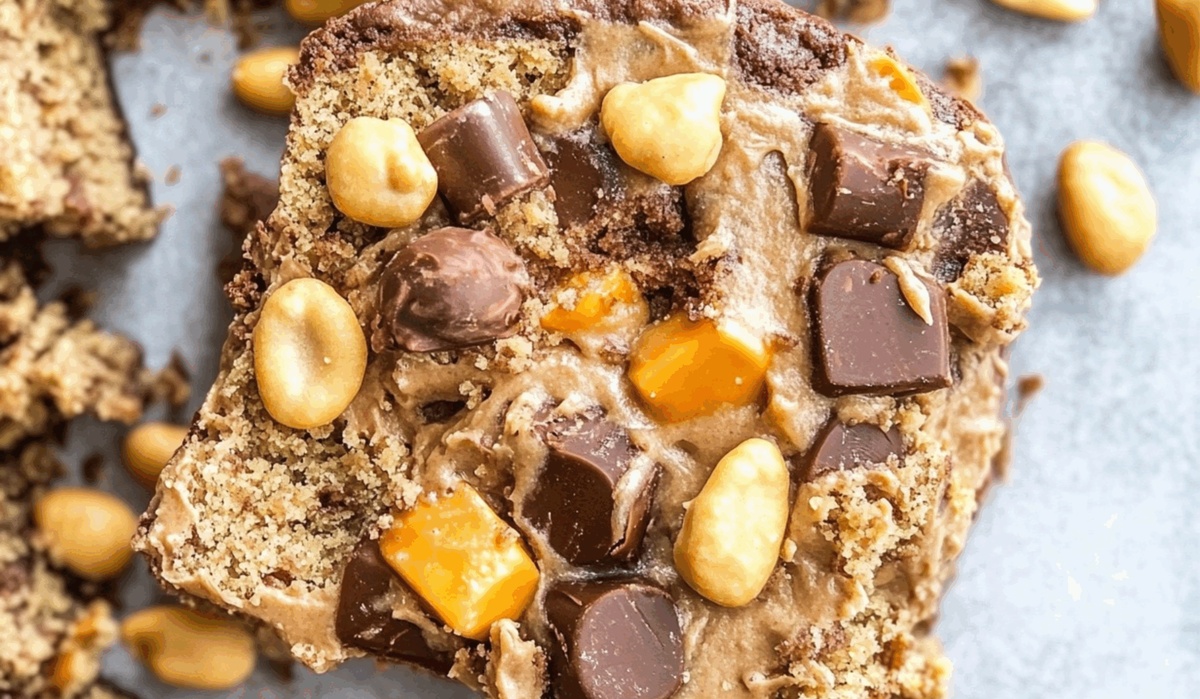
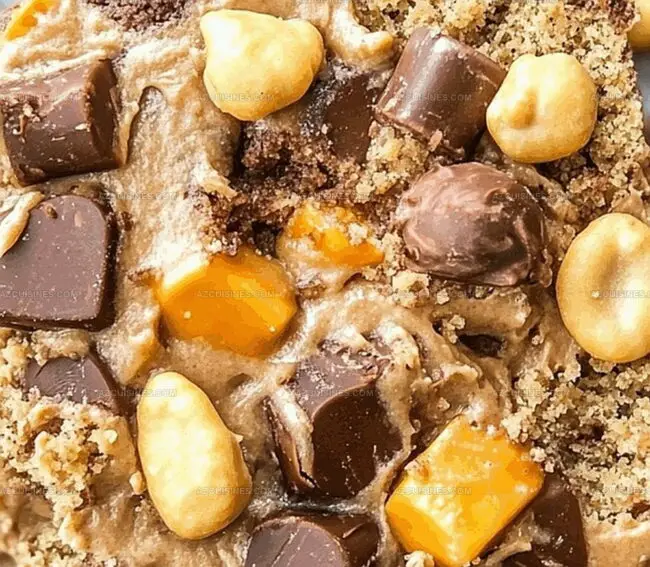
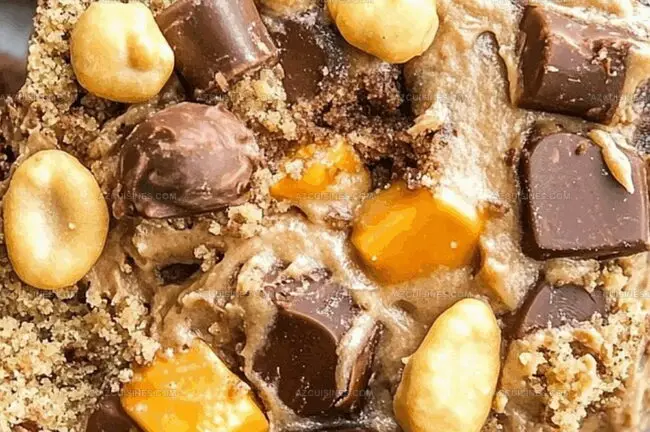
Pour the chocolate sauce over the peanut butter layer, allowing it to create natural, artistic patterns. Sprinkle chopped peanut butter cups and peanuts across the entire cake surface.
Step 8: Bake to Perfection
Place the cake in the preheated oven and bake for 40-45 minutes. Check doneness by inserting a toothpick into the center – it should come out with just a few moist crumbs.
Step 9: Cool and Serve
Let the cake cool completely in the pan. Cut into squares and serve this decadent dessert that combines rich chocolate, creamy peanut butter, and soft cake in every bite.
Helpful Tips For Peanut Butter Earthquake Cake Beginners
Creative Swaps For Peanut Butter Earthquake Cake
Best Pairings For Peanut Butter Earthquake Cake
Simple Storage Tips For Peanut Butter Earthquake Cake
Peanut Butter Earthquake Cake FAQs Made Easy
The swirling technique of dolloping the peanut butter cream cheese mixture randomly over the cake batter creates uneven pockets and layers, resulting in a cracked, messy-looking surface that resembles an earthquake’s landscape.
Yes, you can use different cake mix flavors like white or chocolate instead of yellow, and swap peanut butter cups with other chocolate candies like Snickers or Reese’s Pieces if needed.
Check the cake at 40 minutes by inserting a toothpick in the center. If it comes out with a few moist crumbs and the edges are slightly pulling away from the pan, it’s ready. Avoid overbaking to maintain a soft, gooey texture.
Print
Peanut Butter Earthquake Cake Recipe
- Total Time: 1 hour 5-10 minutes
- Yield: 12 1x
Description
Sinful layers of peanut butter delight dance through this Peanut Butter Earthquake Cake, promising rich chocolate swirls and creamy indulgence. Chocolate lovers will savor each extraordinary bite of this irresistible dessert that melts hearts and satisfies deepest sweet cravings.
Ingredients
cake base:
- 1 box yellow cake mix
- 1/2 cup vegetable oil
- 3 large eggs
peanut butter layer:
- 8 oz cream cheese, softened
- 1 cup creamy peanut butter
- 2 cups powdered sugar
- 1/4 cup milk
topping:
- 1/2 cup unsalted butter
- 1/4 cup cocoa powder
- 1/3 cup milk
- 1 tsp vanilla extract
- 2 cups powdered sugar
- 1 cup chopped peanut butter cups
- 1/2 cup chopped peanuts
Instructions
- Preheat the oven to 350°F and grease a 9×13-inch baking pan thoroughly with cooking spray or butter.
- In a large mixing bowl, combine yellow cake mix, vegetable oil, and eggs. Whisk the mixture until smooth and well-incorporated, ensuring no lumps remain.
- Pour the cake batter into the prepared pan, spreading it evenly across the bottom.
- Using an electric mixer, blend softened cream cheese and peanut butter until creamy and uniform in texture.
- Gradually incorporate powdered sugar into the cream cheese mixture, alternating with milk to maintain a smooth consistency.
- Dollop the peanut butter layer randomly over the cake batter, creating swirls and pockets throughout the surface.
- For the chocolate topping, melt butter in a saucepan over medium heat. Whisk in cocoa powder, milk, and vanilla extract until completely blended.
- Remove the chocolate mixture from heat and stir in powdered sugar until the sauce reaches a silky, pourable consistency.
- Drizzle the chocolate sauce over the peanut butter layer, allowing it to create natural patterns across the cake’s surface.
- Sprinkle chopped peanut butter cups and peanuts evenly over the entire cake.
- Bake for 40-45 minutes, or until a toothpick inserted in the center comes out clean with a few moist crumbs.
- Allow the cake to cool completely in the pan before cutting into squares and serving.
Notes
- Customize the cake mix by using gluten-free yellow cake mix for those with dietary restrictions, ensuring everyone can enjoy this decadent dessert.
- Prevent cream cheese from forming lumps by allowing it to reach room temperature before blending with peanut butter, creating a smoother mixture.
- Enhance the cake’s texture by gently folding peanut butter mixture into batter instead of dropping randomly, resulting in more even distribution of flavors.
- Store leftover cake in an airtight container in the refrigerator for up to 5 days, letting flavors meld and intensify with time.
- Prep Time: 20 minutes
- Cook Time: 40-45 minutes
- Category: Desserts, Snacks
- Method: Baking
- Cuisine: American
Nutrition
- Serving Size: 12
- Calories: 458
- Sugar: 41 g
- Sodium: 370 mg
- Fat: 26 g
- Saturated Fat: 10 g
- Unsaturated Fat: 16 g
- Trans Fat: 0 g
- Carbohydrates: 50 g
- Fiber: 2 g
- Protein: 8 g
- Cholesterol: 53 mg
Truc Tran (Kris)
Senior Food Editor
Expertise
Home Cooking, Meal Planning, Recipe Development, Baking and Pastry, Food Editor, Cooking-video Maker, Vietnamese Food Evaluation Expert
Education
Truc Tran (Kris), an experienced food writer and editor, is great at exploring and describing global cuisines, from simple street food to fancy dining. In her writing, she skillfully mixes different flavors, cooking methods, and culinary traditions, showing the unique character of various cultures through their food and drinks. On azcuisines.com, Kris highlights her knowledge, especially in Asian cuisine and worldwide traditional dishes.