
Red Velvet Cheesecake Brownies Recipe for Sweet Dreams
Crafting delectable red velvet cheesecake brownies becomes an art of culinary magic that promises pure indulgence.
Sweet layers meld together in a decadent dance of flavors.
Chocolate and cream cheese create a luxurious harmony that melts across your palate.
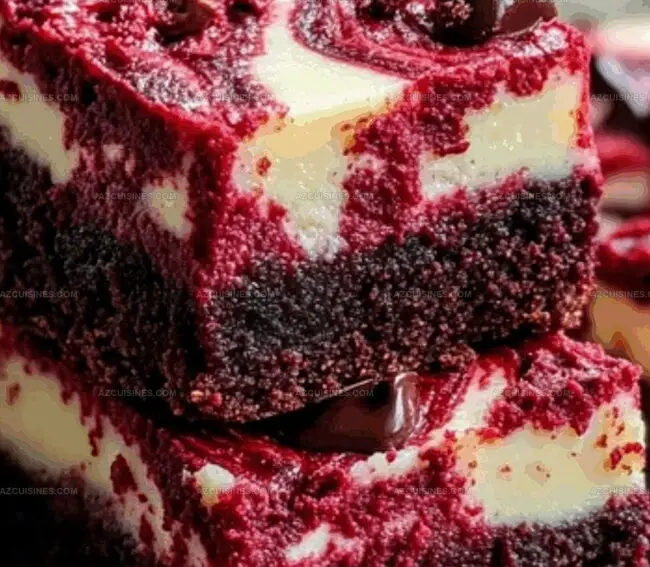
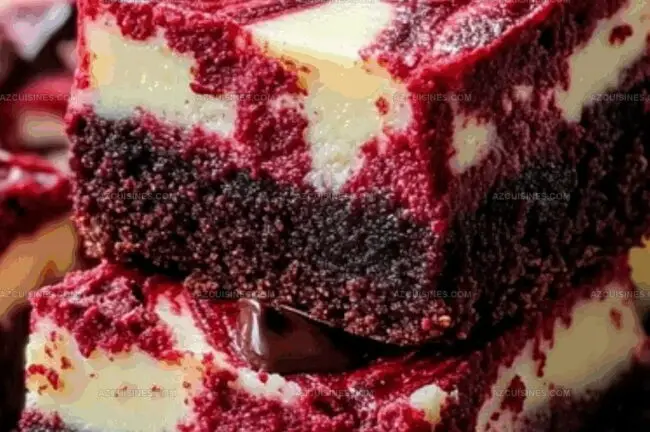
Rich crimson hues peek through velvety swirls, hinting at the delightful complexity within.
Smooth textures intertwine, promising a dessert that looks as stunning as it tastes.
Each bite promises a symphony of contrasting yet complementary sensations.
Prepare to experience a dessert that will become your new obsession.
Why Red Velvet Cheesecake Brownies Are So Worth It
Ingredients for Red Velvet Cheesecake Brownies
Cake Base Ingredients:Wet Ingredients:Flavor and Color Enhancers:Cream Cheese Topping:Finishing Touches:How to Make These Gorgeous Brownies Easily
Step 1: Prepare Baking Station
Grab a 9×13-inch baking pan and line it with parchment paper, letting edges hang slightly over for easy lifting later. Preheat the oven to a toasty 350°F.
Step 2: Mix Dry Ingredients
Combine in a medium bowl:Whisk these ingredients until they’re perfectly blended and set aside.
Step 3: Create Butter Base
In a large mixing bowl, cream butter and sugar together until the mixture looks light and fluffy. Add eggs one at a time, mixing thoroughly after each addition.
Step 4: Build Vibrant Red Mixture
Pour into the butter mixture:Blend until the batter transforms into a stunning, vibrant red color.
Step 5: Combine Wet and Dry Ingredients
Gently fold the dry ingredients into the wet mixture. Stir just until combined – avoid overmixing to keep the texture perfect.
Step 6: Prepare Cream Cheese Topping
Beat cream cheese in a separate bowl until it reaches a silky smooth consistency.
Step 7: Layer the Batter
Spread the brownie batter evenly into the prepared pan. Drop softened cream cheese in dollops across the surface.
Step 8: Create Marbled Design
Use a knife to swirl the cream cheese through the brownie batter, creating a beautiful marbled pattern.
Step 9: Bake to Perfection
Slide the pan into the preheated oven and bake for 25-30 minutes. Check doneness by inserting a toothpick – it should come out with a few moist crumbs.
Step 10: Cool and Finish
Remove from the oven and let the brownies cool completely in the pan for about an hour. Once cooled, lift out using the parchment paper edges.
Step 11: Add Final Touches
Dust with powdered sugar and sprinkle white chocolate chips on top if desired. Cut into squares and serve at room temperature or chilled.
Tips for Swirling the Cheesecake Just Right
Flavor Swaps for Red Velvet Cheesecake Brownies
What to Serve with These Brownies
How to Store Your Red Velvet Brownies
Brownie FAQs for Beginners
The red food coloring creates the signature vibrant red hue, which is enhanced by the small amount of cocoa powder and white vinegar in the recipe.
Yes, you can omit the food coloring, but the brownies will look more like traditional chocolate brownies without the classic red velvet appearance.
These ingredients help activate the cocoa powder and create a tender, slightly tangy flavor characteristic of red velvet desserts, while also helping to soften the texture of the brownies.
Drop dollops of cream cheese mixture across the brownie batter and use a knife to gently drag and create swirl patterns, being careful not to overmix.
Print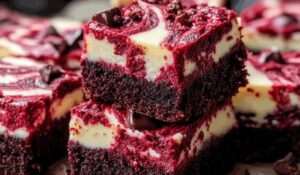
Red Velvet Cheesecake Brownies Recipe
- Total Time: 1 hour 50 minutes
- Yield: 12 1x
Description
Indulgent red velvet cheesecake brownies blend rich chocolate with creamy cheesecake for an irresistible dessert. Rich layers of flavor and texture promise a delightful experience that will satisfy sweet cravings in one luxurious bite.
Ingredients
Main Ingredients:
- 2 cups all-purpose flour
- 1 cup granulated sugar
- 1/2 cup unsweetened cocoa powder
- 1/2 cup unsalted butter
- 2 large eggs
- 8 oz cream cheese
- 1/4 cup buttermilk
- 2 tbsp red food coloring
Leavening and Binding:
- 1 tsp baking powder
- 1/2 tsp salt
- 1 tsp vanilla extract
- 1 tbsp white vinegar
Topping and Garnish:
- 1/4 cup powdered sugar
- 2 tbsp white chocolate chips (optional)
Instructions
- Preheat the oven to 350°F and line a 9×13-inch baking pan with parchment paper, allowing slight overhang for easy removal.
- Whisk together flour, cocoa powder, baking powder, and salt in a medium bowl until thoroughly combined and set aside.
- Cream butter and granulated sugar in a large mixing bowl until light and fluffy, then incorporate eggs one at a time, mixing well after each addition.
- Add buttermilk, red food coloring, white vinegar, and vanilla extract to the butter mixture, blending until a vibrant red color is achieved.
- Gently fold the dry ingredients into the wet mixture, stirring until just combined to prevent overmixing.
- In a separate bowl, beat cream cheese until smooth, then carefully spread the brownie batter into the prepared pan.
- Drop softened cream cheese mixture in dollops across the brownie batter, using a knife to create a marbled swirl effect.
- Bake for 25-30 minutes, or until a toothpick inserted near the center comes out with a few moist crumbs.
- Remove from oven and let cool completely in the pan for about 1 hour.
- Lift the brownies out using parchment paper edges, dust with powdered sugar, and optionally sprinkle white chocolate chips on top.
- Cut into squares and serve at room temperature or chilled.
Notes
- Prevent Overmixing: Gently fold dry ingredients into wet mixture to maintain a tender, soft brownie texture and avoid developing tough gluten strands.
- Color Intensity Tip: Use gel food coloring for a more vibrant, concentrated red color without adding extra liquid to the batter.
- Cream Cheese Swirl Technique: Ensure cream cheese is at room temperature for smoother spreading and easier marbling effect.
- Make-Ahead Friendly: These brownies can be stored in an airtight container for up to 5 days in the refrigerator, making them perfect for advance preparation.
- Prep Time: 20 minutes
- Cook Time: 30 minutes
- Category: Desserts, Snacks
- Method: Baking
- Cuisine: American
Nutrition
- Serving Size: 12
- Calories: 290
- Sugar: 22 g
- Sodium: 150 mg
- Fat: 14 g
- Saturated Fat: 8 g
- Unsaturated Fat: 4 g
- Trans Fat: 0 g
- Carbohydrates: 36 g
- Fiber: 1 g
- Protein: 3 g
- Cholesterol: 50 mg
Truc Tran (Kris)
Senior Food Editor
Expertise
Home Cooking, Meal Planning, Recipe Development, Baking and Pastry, Food Editor, Cooking-video Maker, Vietnamese Food Evaluation Expert
Education
Truc Tran (Kris), an experienced food writer and editor, is great at exploring and describing global cuisines, from simple street food to fancy dining. In her writing, she skillfully mixes different flavors, cooking methods, and culinary traditions, showing the unique character of various cultures through their food and drinks. On azcuisines.com, Kris highlights her knowledge, especially in Asian cuisine and worldwide traditional dishes.