Make a Jolly Red Velvet Christmas Tree Cake Recipe Today
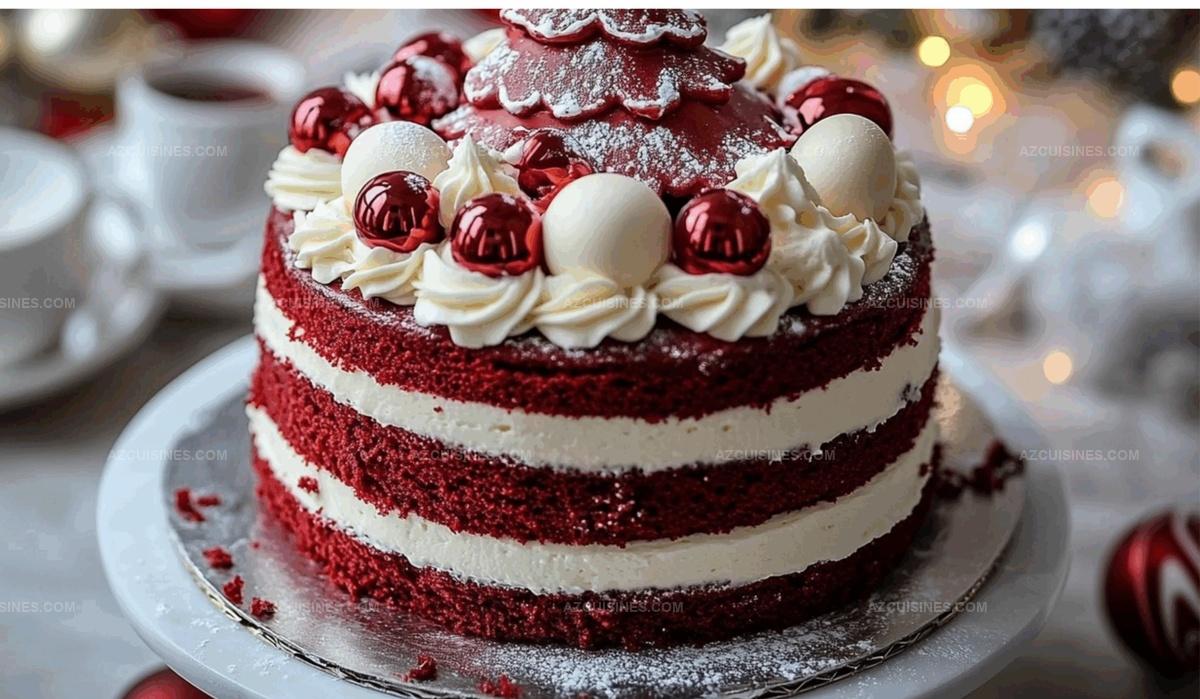
Crafting a delightful red velvet christmas tree cake brings festive magic to your holiday table.
Sweet memories bloom from every vibrant slice of this seasonal dessert.
Layers of crimson-hued cake create a stunning centerpiece that sparkles with winter charm.
Elegant chocolate decorations and cream cheese frosting transform this treat into a show-stopping celebration.
Rich, velvety textures mingle with classic holiday flavors that dance across your palate.
Delicate and whimsical, this cake captures the spirit of Christmas in each delectable bite.
Trust this recipe to become your new favorite seasonal tradition that will have everyone asking for seconds.
Why This Red Velvet Cake Is Perfect for the Holidays
Ingredients That Make Red Velvet Christmas Cake Shine
Dry Ingredients:Wet Ingredients:Frosting Ingredients:Decorative Ingredients:How to Make Your Tree-Shaped Cake a Showstopper
Step 1: Prepare Oven and Pan
Warm up the oven to 350°F. Spray a tree-shaped or standard cake pan with cooking spray and dust with flour to prevent sticking.
Step 2: Mix Dry Ingredients
Sift flour, cocoa powder, and salt together in a medium bowl. Break up any clumps to ensure a smooth batter.
Step 3: Combine Wet Ingredients
In a large bowl, whisk together:Blend until the mixture looks smooth and vibrant.
Step 4: Create Cake Batter
Gently fold dry ingredients into wet mixture. Stir carefully to avoid overmixing, which can make the cake tough.
Step 5: Add Baking Soda
Sprinkle baking soda into the batter. Mix thoroughly to activate and enhance the cake’s rich red color.
Step 6: Pour and Prepare for Baking
Transfer batter to the prepared pan. Spread evenly and tap the pan on the counter to remove air bubbles.
Step 7: Bake the Cake
Slide the pan into the oven. Bake for 25-30 minutes until a toothpick comes out clean with just a few crumbs.
Step 8: Cool the Cake
Let the cake rest in the pan for 10 minutes. Transfer to a wire rack and allow to cool completely.
Step 9: Whip Up Cream Cheese Frosting
Beat cream cheese and butter until light and fluffy. This creates a smooth base for the frosting.
Step 10: Finish Frosting
Add powdered sugar and vanilla extract. Mix until the frosting becomes creamy and spreadable.
Step 11: Color the Frosting
Blend green food coloring into the frosting. Adjust the shade to create a festive tree-like green.
Step 12: Frost the Cake
Cover the entire cake with the green cream cheese frosting. Use smooth, even strokes.
Step 13: Create Tree Texture
Use a piping bag or spatula to form layered branches. This gives the cake a realistic tree appearance.
Step 14: Add Festive Decorations
Sprinkle white edible pearls or sprinkles across the cake. This creates a snowy, winter wonderland effect.
Step 15: Chill and Serve
Refrigerate the cake for at least an hour. This helps the frosting set and allows flavors to blend beautifully.
Red Velvet Cake Tips for Color and Flavor
Unique Twists on the Classic Red Velvet Tree Cake
Treats That Complement Red Velvet Cake
How to Store Red Velvet Cake and Keep It Moist
Questions About This Festive Red Velvet Cake
The white vinegar helps activate the baking soda, creating a lighter, more tender cake texture and enhancing the cake’s signature red color.
Yes, you can make a buttermilk substitute by mixing regular milk with a tablespoon of white vinegar or lemon juice and letting it sit for 5 minutes before using.
Avoid overmixing the batter and be careful not to overbake. Check the cake a few minutes before the recommended baking time and remove it from the oven when a toothpick comes out with just a few moist crumbs.
Print
Red Velvet Christmas Tree Cake Recipe
- Total Time: 2 hours
- Yield: 12 1x
Description
Red velvet Christmas tree cake weaves festive magic into a classic dessert, creating a showstopping centerpiece for holiday celebrations. Rich cocoa-infused layers draped in cream cheese frosting deliver delightful seasonal cheer you’ll treasure with family and friends.
Ingredients
Main Ingredients:
- 2 1/2 cups all-purpose flour
- 1 1/2 cups granulated sugar
- 1/2 cup unsweetened cocoa powder
- 2 large eggs
- 1 cup buttermilk
- 1/2 cup vegetable oil
- 2 tbsp red food coloring
Wet and Binding Ingredients:
- 1 tsp vanilla extract
- 1 tsp white vinegar
- 1/2 tsp salt
- 2 tsp baking soda
Frosting and Decoration:
- 16 oz cream cheese, softened
- 1/2 cup unsalted butter, softened
- 4 cups powdered sugar
- 1 tsp vanilla extract
- Green food coloring
- White sprinkles or edible pearls
- Chocolate tree-shaped mold or piping bag for tree design
Instructions
- Preheat the oven to 350°F and prepare a tree-shaped cake pan or standard cake pan with cooking spray and flour coating.
- Sift together flour, cocoa powder, and salt in a medium mixing bowl, ensuring no lumps remain.
- In a separate large bowl, whisk granulated sugar, eggs, buttermilk, vegetable oil, red food coloring, vanilla extract, and white vinegar until smooth and evenly blended.
- Gradually fold the dry ingredients into the wet mixture, stirring gently until just combined to prevent overmixing.
- Incorporate baking soda into the batter, mixing until fully integrated and creating a vibrant red color.
- Pour the batter into the prepared pan, spreading evenly and tapping the pan to release any air bubbles.
- Bake for 25-30 minutes, or until a toothpick inserted into the center comes out clean with minimal crumbs.
- Allow the cake to cool completely in the pan for 10 minutes, then transfer to a wire rack for thorough cooling.
- Prepare the cream cheese frosting by beating softened cream cheese and butter until light and fluffy.
- Gradually add powdered sugar and vanilla extract, mixing until smooth and creamy.
- Incorporate green food coloring into the frosting, adjusting the shade to achieve a festive tree-like color.
- Once the cake is completely cooled, frost the entire surface with the green cream cheese mixture.
- Create tree-like texture by using a piping bag or spatula to form textured, layered branches.
- Decorate with white sprinkles or edible pearls to mimic snow and add a festive winter touch.
- Refrigerate the cake for at least 1 hour before serving to allow frosting to set and flavors to meld.
Notes
- Choose high-quality cocoa powder for a rich, deep flavor that enhances the red velvet’s signature taste.
- Ensure ingredients are at room temperature to create a smoother, more uniform cake batter.
- Room-temperature eggs blend more easily and help create a lighter, more tender cake texture.
- Avoid overmixing the batter to prevent a tough, dense cake – mix just until ingredients are combined.
- Use gel food coloring for a more vibrant red color that doesn’t water down the batter.
- Check cake doneness by gently pressing the center – it should spring back when touched.
- For a gluten-free version, substitute all-purpose flour with a 1:1 gluten-free baking blend.
- Refrigerate cake for easier frosting and to help stabilize the cream cheese icing.
- Prep Time: 30 minutes
- Cook Time: 30 minutes
- Category: Desserts
- Method: Baking
- Cuisine: American
Nutrition
- Serving Size: 12
- Calories: 350
- Sugar: 36 g
- Sodium: 300 mg
- Fat: 18 g
- Saturated Fat: 8 g
- Unsaturated Fat: 10 g
- Trans Fat: 0 g
- Carbohydrates: 45 g
- Fiber: 1 g
- Protein: 4 g
- Cholesterol: 50 mg
Truc Tran (Kris)
Senior Food Editor
Expertise
Home Cooking, Meal Planning, Recipe Development, Baking and Pastry, Food Editor, Cooking-video Maker, Vietnamese Food Evaluation Expert
Education
Truc Tran (Kris), an experienced food writer and editor, is great at exploring and describing global cuisines, from simple street food to fancy dining. In her writing, she skillfully mixes different flavors, cooking methods, and culinary traditions, showing the unique character of various cultures through their food and drinks. On azcuisines.com, Kris highlights her knowledge, especially in Asian cuisine and worldwide traditional dishes.